How to Change the Server Engine Version?
General Information
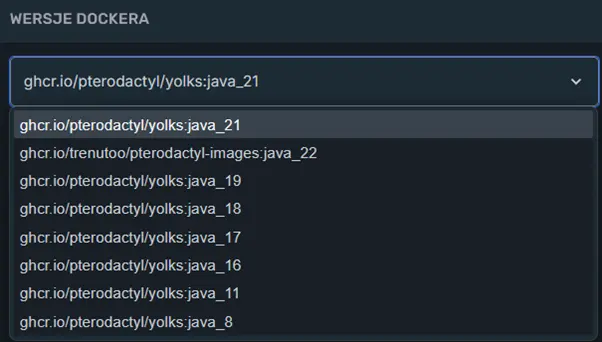
Changing the Minecraft version may result in the deletion or overwriting of current server files. Keep in mind that newer engines require appropriate Java environment releases to function. To change the Java version, go to the Startup Parameters tab and select the appropriate Docker image from the drop-down list.
Required Java version depending on the game release:
| Engine version | Recommended Java version |
|---|---|
| 1.8.x - 1.11.x | Java 8 |
| 1.12.x - 1.16.x | Java 11 |
| 1.17.x - 1.20.4 | Java 17 |
| 1.20.5 - 1.21.11 | Java 21 |
| 26.1 - 26.2+ | Java 25 |
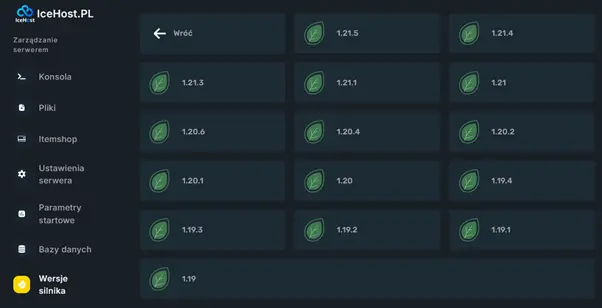
Changing via the Engine Version Tab
- Go to the Engine versions tab on the left side of the navigation bar.

- Select the engine you want to install (e.g., Leaves).
- Select the engine version you want to upload to the server (e.g., 1.21.5).
- Check the first option (required to download the files). If you want to completely wipe the server of current plugins, mods, and maps, check the second option as well.
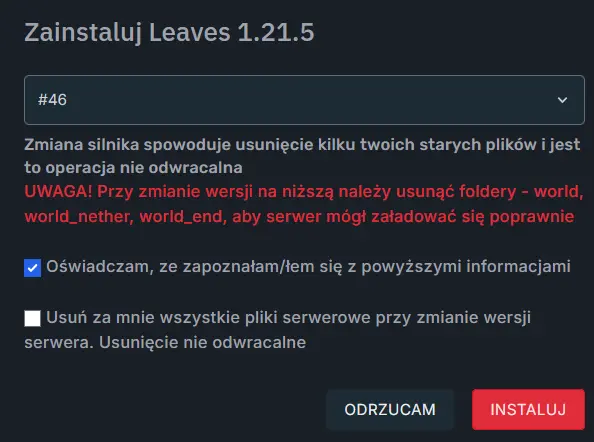
ATTENTION:
Checking the second option permanently deletes all data from the server. Before performing this operation, make sure you have an up-to-date Backup.
- Click the INSTALL button.
- Once the download process is complete, go to the Console tab and click START to run the server on the new version.
Manual Change by Replacing the Startup .jar File
Method 1: Via the Panel
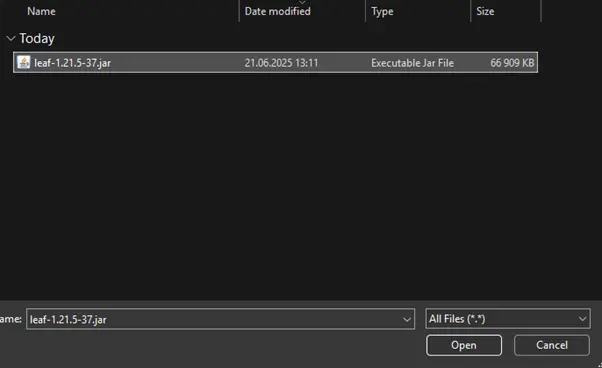
- Navigate to the Files tab in the server management panel.
- Click the Upload to server button in the top right corner of the screen.

- Select the previously downloaded engine file from your computer's disk (e.g.,
leaf-1.21.5-37.jar) and wait for the transfer to finalize.
- Click the three dots icon next to the uploaded file, select the Rename option, change it exactly to
server.jar, and confirm with the RENAME button.

- Go to the Console tab and click START.
Method 2: Via the SFTP Protocol
- Connect to the server using an external program (e.g., WinSCP) – details can be found in the How to connect to SFTP? guide.
- Prepare the engine file on your computer.
- Drag the file from the left panel (your computer) to the right panel (the server's root directory
/home/container) and wait for the upload to complete.

- Right-click on the uploaded file, select the Rename option, change it to
server.jar, and confirm with the Enter key.

- Go back to the web panel, navigate to the Console tab, and start the machine with the START button.