How to Add a Resource Pack to a Server?
Adding your own resource pack (Resource Pack / Texture Pack) allows you to completely change the visual style of your server. You can introduce custom item textures, 3D models, user interface (UI) elements, or dedicated music. Most importantly, a properly configured pack will download automatically for every player upon joining the server.
How Server-Side Resource Pack Downloads Work
Minecraft does not store resource pack files directly on the game server's disk. The server sends a direct download link to the .zip file along with a unique authorization code (checksum) called SHA-1 to the joining player's client. The game client then downloads this file into its cache and loads it locally.
For this process to succeed, the file must be hosted on a platform that supports direct downloading. Standard links from services like Google Drive or Mediafire will not work because they return a web page with a click button rather than the raw binary file.
File Hosting and Data Generation
Choose one of the two methods below to share your pack online.
Method 1: Using MC-Packs.net
MC-Packs is a free hosting service created specifically for Minecraft resource packs. Its main advantage is that it automatically generates both the direct download link and the SHA-1 checksum. The maximum file size limit is currently 95 MB.
- Go to the mc-packs.net website.
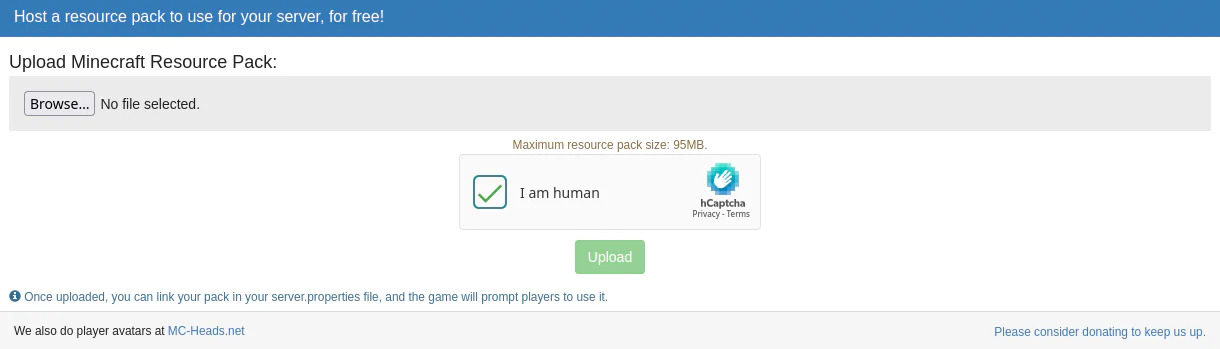
- Click the Choose File button and select your resource pack file in
.zipformat. - Click the green Upload button.
- Once the upload is complete, you will see a message saying "Your Resource Pack has been uploaded!".
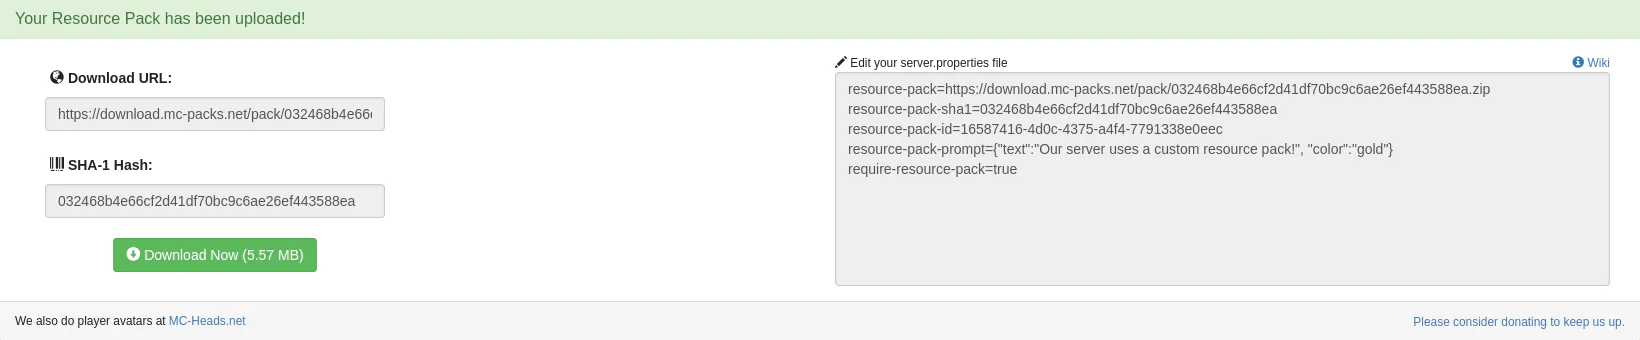
- Copy and save the data generated on the left side: Download URL and SHA-1 hash (if you encounter an error with the mcmeta file during upload, see how to fix it).
Method 2: Using Dropbox
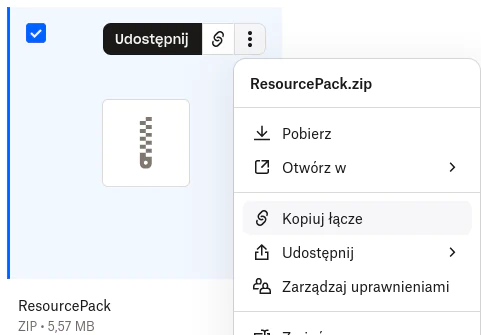
If your resource pack is larger than 95 MB, you can use a free Dropbox account.
- Log in to dropbox.com and upload your
.zipfile to the cloud. - Click the 3 dots next to the file, then click Copy link.
- You will get a link that looks something like this:
https://www.dropbox.com/s/xyz/pack.zip?dl=0 - Crucial change: Change the end of the link from
?dl=0to?dl=1. Without this, the game engine will not download the file.
To obtain the required SHA-1 code for the Dropbox method, you must use any online checksum generator (e.g., Online-tools), drop your .zip file there, and copy the generated 40-character string.
Configuration in server.properties
Once you have your direct link and SHA-1 code ready, it's time to add them to your server configuration.
- Stop the server in the Console tab.
- Go to the Files tab -> server.properties.
- Locate the following parameters and fill them in with your hosting data:
require-resource-pack=true
resource-pack=https://download.mc-packs.net/pack/032468b4e66cf2d41df70bc9c6ae26ef443588ea.zip
resource-pack-sha1=032468b4e66cf2d41df70bc9c6ae26ef443588ea
Parameter Explanations:
require-resource-pack– setting this totrueautomatically kicks players from the server if they decline the pack installation. Setting it tofalseallows them to play with default textures.resource-pack– the exact, direct URL to download the.zipfile.resource-pack-prompt– an optional text message displayed on the player's screen requesting them to accept the files.resource-pack-sha1– the file's checksum. This is the most critical element for caching. If you update your resource pack on the hosting service, you must generate and enter a new SHA-1 code here. Otherwise, Minecraft will assume the file hasn't changed and won't download the new version for players who have already joined the server once.
Always remember to update the resource-pack-sha1 field every time you make changes to the texture files. Otherwise, players won't see the new content introduced in the pack update!
- Click the SAVE CONTENT button at the bottom of the page.
- Go to the Console tab and restart the server.
Troubleshooting
Error: "Missing mcmeta data: Invalid resource pack"
This error appears on the MC-Packs website when the .zip archive structure is incorrect. The most common mistake is zipping the entire main folder instead of its direct contents. The game engine requires key files to be located directly in the root directory of the archive.
Correct folder structure inside the .zip file:
pack.zip
 ├── 📁 assets/
 ├── 📄 pack.mcmeta
 └── 🖼️ pack.png
How to fix it:
- Extract the broken
.zipfile on your desktop. - Open the extracted folder.
- Directly select the
assetsdirectory, thepack.mcmetafile, and thepack.pngimage. - Right-click the selected items and choose Compress to ZIP file (or your compression tool's equivalent).
- The newly prepared archive will easily pass verification on the MC-Packs website.
Resource pack does not load for a specific player
If the server is running correctly and the issue occurs only for individual players, the fault lies within their game client configuration. Ask the player to perform the following steps:
- Go to the Multiplayer tab in the main menu.
- Select the server from the list and click the Edit button at the bottom.
- Locate the Server Resource Packs option.
- Change its value from Disabled to Prompt or Enabled.
Adding a Resource Pack via the Nexo Plugin
The Nexo plugin completely automates server-side resource pack management. Instead of manually uploading archives to external hosts and updating SHA-1 checksums in server.properties, Nexo can automatically merge your textures with its own custom models, compress them, and distribute them to players on the fly.
Uploading Your Own Pack (Importing)
Nexo supports the native Minecraft structure but offers a much more convenient mechanism to automatically merge external packs.
- In the server panel, navigate to the Files tab and open the directory:
plugins/Nexo/pack/external_packs/ - Drop your pack's
.zipfile there (e.g.,MyPack.zip).
During asset generation, the Nexo engine will dynamically extract your archive and merge it with the plugin's internal assets. If your pack includes its own sounds.json or custom font definitions, Nexo will intelligently combine these records with its own instead of overwriting them. Because of this, updating textures on your end simply means dragging the .zip file into this folder.
Choosing a Distribution Method (PackServer)
Nexo needs to know how to deliver the built pack to game clients. This configuration is defined in plugins/Nexo/settings.yml under the Pack.server.type section. You can choose from the two most popular methods for hosting your assets:
Method 1: POLYMATH (Recommended and Simplest)
In this mode, the plugin automatically sends the compiled pack to an external, free distribution server maintained by the Nexo developers (located in Germany) and passes a secure, ready-to-use link to the players. This does not require any additional port configuration in your hosting panel.
To activate it, ensure that your server section in plugins/Nexo/settings.yml looks like this:
Pack:
  server:
    type: POLYMATH
    polymath:
      server: atlas.nexomc.com
      secret: nexomc
Method 2: SELFHOST (Self-Hosting from the IceHost Server)
This mode allows you to run an internal web server directly on your Minecraft server instance. For external players to download files directly from your machine, you must allocate a dedicated network port to the plugin.
Step-by-Step Configuration Instructions:
- Go to the Network tab in the server panel (located on the left navigation bar).
- Click the Create Port button, selecting port zew proxy from the drop-down list.
- The system will generate an additional line in the ports table.
- Copy the newly generated Port (In my case, the newly opened external proxy port is
44004). Also, note your IP Address (83.168.105.245). - Go to the Files tab ->
plugins/Nexo/settings.yml. - Locate the
Pack.serversection and change thetypevalue toSELFHOST. - Fill in the
portandpublic_addressparameters according to the template below, using the data you copied from the Network tab:
Pack:
  server:
    type: SELFHOST
    selfhost:
      port: 44004
      public_address: [http://83.168.105.245:44004](http://83.168.105.245:44004)
      dispatch_threads: 1
After saving the file and reloading the plugin, the built-in HTTP server will start distributing the resource pack directly from your machine.
Protecting Textures from Theft (Obfuscation)
To protect your custom models and artwork from being stolen by other servers, Nexo includes a built-in obfuscation system. This is configured in settings.yml under the Pack.obfuscation.type key. There are three levels available:
- NONE: No protection (the pack is fully transparent).
- SIMPLE (Nexo's Default Mode): Encrypts only file names (e.g., changing
sword.jsonto a random UUID string) while leaving the original folder names intact. This provides about 90% sufficient protection. - FULL: Encrypts absolutely everything: both file names and namespaces (directory names).
Enforcing the Pack on Join (Dispatch)
In the settings.yml file under the Pack.dispatch section, you can manage the game client's behavior:
mandatory: true– behaves exactly like therequire-resource-pack=truekey inserver.properties. The player will be disconnected if they refuse to download the Nexo pack.send_pre_join: true– sends assets to the player during the login protocol layer, before their character physically loads into the game world. This prevents model pop-in and loading errors.
Useful Commands and Reloading
Every time you modify texture files or add a new .zip archive to the external_packs folder, you do not need to restart the entire server.
- Type the following command in the console:
nexo reload pack - The Nexo engine will reassemble the files from scratch, apply obfuscation, compress the archive, and immediately update the assets for the players.